
The Pointer Environment Idiot's Guide |
by
Norman Dunbar |
1. THE POINTER ENVIRONMENT
This little booklet is intended as a user's guide to the Pointer Environment. Some astute readers may already have noticed the footer has the words "an idiot's guide" - please don't be offended - the idiot is me !
It is not a manual on how to use the Pointer Environment, nor will it teach you how to write programs. It is my intention to have this booklet included with all my Pointer programs, thus removing the need to duplicate information in all of their manuals.
If the program you have just purchased is your first Pointer driven one, then please read this manual in order to gain a better understanding of any technical terms used in the manual for your new program.
If you are a seasoned user of Pointer programs, then this manual might still prove useful, but you will probably be aware of most of the information contained in it.
The Pointer Environment, sometimes called the Extended Environment, is a method of allowing the QL to have things such as non-destructive windows, the use of mice (mouses ?), menus etc. The Pointer Environment was designed and written by Tony Tebby and Jonathan Oakley.
Many programs are now being written to use the PE, as it will be known from now on, especially programs written on the Continent by people like Jochen Merz etc.
This manual can be used by the 'PE unaware' so that a better understanding of what these 'new fangled' programs are all about. This manual does not cover any particular program in detail, but gives a general overview - once you can follow what is going on with one program, it should (note, should) be easier to follow the rest.
Although this outline does not relate to any particular program, various screen dumps etc will be shown to illustrate a point or two. These screen shots are all taken from a single program, but the issues being discussed are valid for most, if not all, PE programs.
2. HOW TO TELL IF YOU HAVE THE PE OR NOT
If you buy a pointer driven program from a QL trader's adverts or software catalogue, you will find mentioned somewhere that the program in question requires the PE to run. In most (all ?) of these cases, you will be supplied with the required parts of the PE that the program needs.
Other advertisers also state whether the PE is required and if it is supplied or not.
There are so many program that require the PE these days and that seem to supply the same files on each disc, that some people might get confused and think that these files that keep turning up, PTR_GEN, WMAN, HOT_REXT, MENU_REXT etc, are public domain - they most certainly are not. These files are Copyrighted and for each program sold, a royalty payment has to be made to the authors.
3. WHAT FILES MAKE UP THE PE ?
The basic PE is considered to be made up of three main files, PTR_GEN, WMAN and HOT_REXT.
3.1 PTR_GEN
PTR_GEN is the first file that must be loaded into your QL, if not, an error will occur when one of the other two programs are loaded. PTR_GEN is loaded by using the LRESPR command from Toolkit 2 or by the original RESPR, LBYTES and CALL commands for those without Toolkit 2. Other toolkits may have their own versions of these commands. The outcome is that PTR_GEN installs itself into your QL and not a lot happens !
PTR_GEN is the part of the PE that is responsible for handling the POINTER that you see on screen. This normally takes the form of an arrow head pointing to the top left corner of the screen, but some programs change the pointer to something more suitable for their own needs. Pointers are discussed in more detail below.
PTR_GEN extends the handling of CON_ channels within your QL - but you as the user don't need to know about this nor do you have to do anything. Easy stuff this, so far.
The first thing that you will notice after PTR_GEN has been loaded is that when you use CTRL and C to switch between a number of tasks that are running in your QL, the screen never needs to be refreshed !
For example, imagine that you have loaded a copy of EDITOR by Digital Precision, and SuperBasic, as usual, is running. You are typing something in to the EDITOR and need to save it, but you cannot remember which files are on the appropriate drive. Normally you would use CTRL C to switch back to SuperBasic, type in something like DIR FLP1_ and press ENTER, check out the list of files then CTRL C back into EDITOR and press the key combination to redraw the screen display which has been written over by the list of files.
What now happens is that when you CTRL C back to SuperBasic, the original contents of the SuperBasic screen are automatically refreshed for you, and the EDITOR screen vanishes (or maybe part of it does). Having DIR'd to get up the list of files on the device, when you switch back into EDITOR, the screen changes back once more to the EDITOR display without you having to do anything. (In fact, I cannot remember what the screen refresh keys are in EDITOR these days !!!!)
So, we have an advantage already.
Another 'bonus' of PTR_GEN is that it likes to keep the screen tidy. Some peple may not consider it a bonus, but I do. QDOS, the QL's Operating System, is a multi-tasking operating system and allows more than one program to run in the QL at the same time. This is an illusion, but for simplicity we will assume that they all run together.
When a program opens up a window to use for its display, it usually overwrites whatever was on the screen before and sometimes you can have two or more programs all merrily writing to the screen at once, lovely mess !
PTR_GEN only allows the program that is 'at the top of the pile' to write to the screen. All the others are suspended until they are on the 'top of the pile'. This seems to destroy the QL's multi-tasking abilities but more of this later.
When you start up the QL, SuperBasic is running and nothing else. Any program that you run can therefore use any part of the screen that it likes with no problems. If, however, you now EXEC another program, it too may require a bit of the screen to write to, your EDITOR for example. If the new program opens a window which overlaps part or all of the SuperBasic windows, then SuperBasic is prevented from writing to the screen.
This procedure is carried out for the next program, which may stop the EDITOR writing to the screen, and so on. Any program which does not require to write to the screen does not stop running so multi-tasking is still going on. I don't think that there are very many (useful) programs that don't need to use the screen from time to time !
I have heard about a new 'version' of PTR_GEN that allows the parts of a programs windows that are not covered by other program's windows to be written to. I have no experience of this program yet. (This is not a Tony Tebby version)
PTR_GEN has a couple of procedures built in to it. These being CKEYON and CKEYOFF which stand for Cursor KEY ON and Cursor KEY OFF respectively. These commands allow you to select whether the arrow keys on your keyboard will move the pointer or not. CKEYON makes the pointer move when an arrow key is pressed, CKEYOFF means that a mouse has to be used.
Summary of PTR_GEN
PTR_GEN controls the pointer that you see on the screen, handles the extended CON_ drivers and keeps the display tidy when multi-tasking. It is the first file that has to be loaded when the PE is to be used.
3.2 WMAN
WMAN is the second file to be loaded in order to use the PE. It supplies additional features over that supplied by PTR_GEN. WMAN is an acronym for (of) Window MANager, and that is exactly what it does.
WMAN supplies a number of utility routines that are used by the vast majority of programs that have been written to use the PE. The routines handle such things as setting up a window, menus, loose items etc and that is basically it. Don't worry about these technical terms as they are all explained later on.
There is not really a lot more to say about WMAN !
3.3 HOT_REXT
HOT_REXT is the third part of the PE and this one has numerous facilities that are available to the 'ordinary user'. HOT_REXT provides your QL with the HOTKEY system. Hotkeys can be set up to cause some action to be carried out when they are pressed.
On all QLs there are the five function keys, F1 to F5. In the early days of the QL, these could only be used by detecting them using KEYROW or INKEY$ within a program, but they couldn't really be programmed to do anything useful for some time. This was not very much use.
Toolkit 2 provided a command called ALTKEY, which allowed almost any key on the keyboard to be programmed with a useful command or function to be carried out when that key was pressed in conjunction with the ALT key. For example, ALT and C could be used to run the C68 compiler by typing the following :-
ALTKEY 'C', 'EX CC;"-v -TMPram1_ -oram1_test_exe test_c"', ''
Which, without getting too complicated simply means that whenever the user holds down the ALT key then presses the C key, the command in quotes, would be typed in to the keyboard queue and then ENTER would be simulated. This would have the effect of carrying out the command. This was much more useful as fairly large commands could be shortened to a couple of keys pressed at the same time.
The HOTKEY System, as provided by HOT_REXT, is a THING (see later on !) and provides the user with a fairly large number of procedures and functions that can be used to load, exec, wake (more technical stuff) programs, or other THINGs etc.
Most of the commands and functions start with the word HOT_, for example, HOT_STOP, HOT_GO, HOT_LIST.
Summary of HOT_REXT
HOT_REXT provides the HOTKEY system which allows commands to be programmed into certain keys on the keyboard. These commands can be used to initiate or switch to jobs or tasks running in the QL. The HOTKEY system is based on a THING.
4. THINGS
I am led to believe that THINGS are so named because Tony Tebby and Jonathan Oakley couldn't think of another name for them so thay ended up discussing 'those things that you wrote yesterday' etc and the name stuck - THINGS they are then.
Things are implemented to allow tasks to communicate with each other. For example, Digital Precision's TURBO compiler uses a THING like method to pass information from the PARSER task to the CODEGEN task.
The PARSER runs and if there are no errors, leaves information hanging about in the QL's memory for the CODEGEN task to read and use to produce the compiled code. How on earth does the second task know where the first task left the information ?
TURBO picks up its information from a system variable, I believe, and so the CODEGEN task knows where the PARSER left the information. THINGS work in a similar manner, but there is a slight difference.
THINGS can have all sorts of uses, they can be executable things, extension things and all sorts of other things (!)
Probably the most used example of THINGS would be Jochen Merz's QMENU package. This is implemented as a series of extension THINGS, ie, THINGS that act like an extension. This basically means that as far as SuperBasic is concerned, they are just another toolkit, but with subtle differences.
The advantage of a THING is that they can be used by almost any program in the QL. Using QMENU as an example, I can write a SuperBasic program that uses them, a C68 program that uses them or an assembler program that uses them. They all use the same copy of the extensions and can find them in the system without the user knowing where they live.
For those who may have used QMENU but were unaware of it, the file is called MENU_REXT and is responsible for many PE programs having a very similar method of selecting a filename to load or save etc. There are other extensions included in MENU_REXT, but I will not labour the point here.
So that is the basic background to the PE. Next, I will dive in and try to explain what all those technical terms that get mentioned in manuals are about.
5. THE TECHNICALITIES
After you obtain your first PE program, you probably notice things (no relation to the above !) in the manual that puzzle you. Words like OUTLINE, MENUS, POINTER, LOOSE ITEMS, etc etc. What are they and how do you use them ? Read on.
5.1 POINTERs, HITs and DOs
A POINTER is simply a small picture, normally an arrow head, that moves around the screen when you move the mouse or press one or other of the arrow keys. You could also call it a cursor, but that would be slightly inaccurate. The POINTER points. (Does a cursor curse ?)
As you move the pointer around the screen, you might notice that in certain places, a rectangle appears and disappears - you have just found a LOOSE ITEM, but read about that below.
The pointer basically shows you where something is likely to happen.
A HIT is when you move the pointer to a specific place on the screen and either press the SPACE key on the QL or press on the LEFT mouse button.
A DO is when you press ENTER or the RIGHT mouse button.
In good old fashioned QL mode, in the days before PE, when you wanted the QL to DO something, you invariably had the press the ENTER key. Type in a line of code and nothing would happen until you pressed ENTER, once that was done, the line of code would be carried out. So ENTER became the DOing key.
Some of the most often seen pointers are :
showing, from the left :
the normal pointer, the 'window is locked and you can't use it' pointer, the 'there is no window defined here' pointer, the 'needs mode 8' pointer, the 'this window needs some keyboard input' pointer, the 'can't use this window' pointer, the 'move' pointer and finally, the 'size' pointer.
The normal pointer shows up most often and for most programs, will be the only one that you may see, although the programmer can change it to something else.
The padlock means that the window that the pointer is over is partially buried and so the job owning the window is currently locked from use. You are able to use this window if you HIT or DO while the pointer is over the window in question.
The window request pointer shows up when you move the pointer to an area of the screen that is not used by any of the jobs running in the QL at that time.
The mode 8 (and not shown above, the mode 4) pointer appears when the area of the screen where the pointer is belongs to a window that is not in the same mode as the rest of the screen currently showing. The pointer shows a 4 or an 8 depending upon the mode requirements of the program owning the window. If you choose to use a program whose pointer shows that a change of mode is required then the mode will change automatically. This will cause all windows in the 'other' mode to vanish. Moving the pointer over the screen will show them up when it turns to the 'mode' pointer.
The keyboard required pointer shows up when the window you have the pointer over belongs to a program that is currently waiting for you to type something in.
The no entry pointer is used when you have the pointer over a program's window and that program is currently not interested in anything else other than what it is doing. It could be in the middle of a long calculation and may have its cursor turned off. There is no way that you can get at this program yet.
The move pointer is used when you press CTRL and F4 together or HIT/DO on the MOVE loose item (see below). You now move the pointer to where you want the window to be positioned and then HIT or DO it.
Finally, the size pointer is used when you wish to redraw the window bigger or smaller than currently shown. This is, of course, possible only if the program allows it.
5.2 LOOSE ITEMS
These are simply words or pictures on the screen that have been programmed to carry out some function whan HIT or DO'd. They are called LOOSE ITEMS because they can appear almost anywhere on the screen and are not tied down to any one particular place. This doesn't mean that you, the user, can move them about, it is more the author of the program who decides on their location, so he can move them about. By the time you get them, they are stuck down firmly !
The figure below shows a screen from a program called Printer Master 2 and highlights a single loose item.
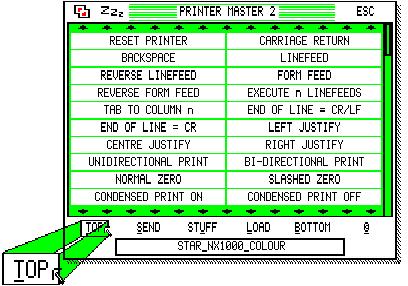
As you can see in the enlarged portion, the loose item has a border around it - this shows that the pointer has been positioned within the area defined to be the boundary of this loose item. The border appears so that the user knows that something can be done here.
Also shown is the SELECTION KEY, which is the letter that has been underlined. Pressing this letter, here it is a 'T', will carry out the same action as will be done when the loose item is HIT or DO'd.
Other loose items can be seen in the main part of the figure, one at the top left looks similar to one of the pointers shown above. This is quite normal. A loose item can have a picture on it as well or some text depending upon which makes most sense to the programmer.
There are a number of loose items along the bottom as well, these being, TOP, SEND, STUFF, LOAD & BOTTOM. At the top there is MOVE, SLEEP and ESC.
A HIT on a loose item may carry out some action and a DO some other action, but this need not always be the case. In some programs a HIT and a DO have the same effect, others do not. This is entirely up to the programmer when the program is being written.
Loose items normally come with a word or picture on them that gives you some idea of what they do. In many programs, a loose item will have one of the letters in the word underlined as a further way of carrying out the required action.
These selection keys are a way to avoid having to always move the pointer over the loose item in order to get something done. This is very handy for people who don't have a mouse. Simply leave the pointer where it is and press the action key and things will happen.
5.3 'STANDARD' LOOSE ITEMS
Many programs appear to have the same set of loose items somewhere on their screens. There may be programs where only some of them are present and others which use them all. These are the 'standard' loose items, MOVE, SLEEP, SIZE and WAKE.
5.3.1 MOVE
The MOVE loose item looks like this :
![]()
When this loose item is HIT/DO'd the pointer turns to the move pointer. Placing the pointer in a new position on the screen then HITting or DOing it causes the whole window for the appropriate program to be moved to the new position.
The move loose item can be chosen using the mouse or keyboard to position the normal pointer over it, it will show a border when the pointer is in the correct place, then HIT or DO it. It can also be selected by pressing CTRL and then F4 (hold down CTRL, press F4, then release both).
Regardless of which method is used, when the pointer is moved to a new position and HIT/DO'd, this will be the new position of the pointer when the window is moved. If there is no room to fit the whole window around the new pointer position, the display will be adjusted to stay in range.
5.3.2 SLEEP
The SLEEP loose item looks like this :
![]()
If you are a user of the program QPAC2, then HITting or DOing this loose item will put the program to sleep as a button in the button frame. If QPAC2 is not loaded, in most programs, this loose item has no effect, although some programs that use the QMENU extensions can put the program to sleep in an unpredictable part of the screen.
In these cases, HITting the button allows you to move it as described above, DOing the button will reactivate the program again.
If the button is in the button frame, DO it to reactivate the program, HITting it will have no effect apart from redrawing the text written on the button.
5.3.3 SIZE
The SIZE loose item looks like this :
![]()
Many programs do not have this loose item, their screen displays are fixed. If this item is present, there are a couple of ways that it can be used.
If you HIT or DO this loose item, the screen display will cycle through a pre-set range of suitable sizes and these are the only sizes that are allowed. This could be because the programmer wishes to retain some control over what size you make the display.
Other programs allow you to define the screen size as you see fit. By HITting or DOing this loose item, the pointer becomes the SIZE pointer and you can move it around the screen.
Moving the pointer down reduces the height of the display, up increases it, move to the right to reduce the width and to the left to increase the width. You can, of course, move down and right to reduce both the height and width. When you HIT or DO again, the screen will be redrawn to the required size - a small adjustment for character sizes and best fit may be done automatically.
A combination of MOVE and SIZE can allow you to make the display fill the entire screen area. (MOVE to the lower right corner then SIZE to the upper left one.)
5.3.4 WAKE
The WAKE loose item looks like this :
![]()
This is another item that may not appear in many programs. If the program displays some information, but the information needs to be updated then HITting or DOing on this loose item will cause the display to be updated.
In addition, if this loose item is present and the program is reactivated (woken) from a button, most programs cause a WAKE to be carried out automatically.
An example of the use of this loose item is in a window that shows the files on a disc, perhaps. If you change discs nothing happens to the display until you re-read the directory. HITting or DOing this loose item will read the directory of the new disc and show its files in the window.
6. OUTLINE or PRIMARY WINDOW
The OUTLINE or PRIMARY WINDOW of a program is quite simply the maximum piece of the entire QL's display that is used by the program in question. This is a bit of a simplification but covers it adequately.
Everything that the program does happens within the area of the screen defined as the program's primary window. All programs that have an OUTLINE set are deemed to be MANAGED and the PE takes care of them from there on. Most, if not all, PE programs handle this and the user need not be aware or worried by it at all. Basically, there is nothing that you need to do because you can't !
If you move the pointer outside of the current program's primary window, the pointer will change from the normal one to one of the others. Pressing a loose item selection key will now have no effect as you are no longer in communication with the program. Move the pointer back into the primary window and all will be well.
7. INFORMATION SUB WINDOWS
An INFORMATION SUB WINDOW is a small part of the program's display, which may or may not have a border around it, in which some information is displayed. The figure below shows a screen dump of a PE program showing an enlarged information sub window.
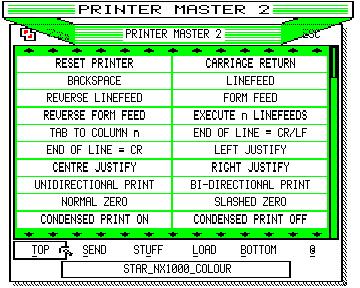
Actually, it is showing 2 information sub windows. The first is the large one with the striped (obligatory green and white stripes !) paper colour. There is nothing else in that particular sub window. The second information sub window is overlaid on the first. This one has the program name, Printer Master 2, as a text type INFORMATION OBJECT embedded in it.
An information sub window need not always have the same text displayed in it. The example above shows one which does, but at the botton of the program's display there is another information sub window.
This one has a black border around it and the text 'STAR_NX1000_COLOUR' shown in it. As the program in question is used, this information sub window is used to show information particular to the function that the program is carrying out at the time. This is a bit difficult to show in a static document so you will have to take my word for it, or buy the program !
8. INFORMATION OBJECTS
As shown in the above screen shot, an information window can have some INFORMATION OBJECTS within them. These objects can be simple text or sprites (pictures - a pointer is just a sprite) The example above shows the text object 'PRINTER MASTER 2' in the enlarged information sub windows.
Information objects need not always be text. There are others as well, such as SPRITES or PATTERNS and BLOBS. These are discussed later.
9. APPLICATION WINDOWS
An APPLICATION WINDOW is simply an area of the program's display that is used by the program, the application, to do whatever the program does ! A drawing program, for example, will have a large area of its display set aside for drawing in. In the figure below, the application window is shown by the large shaded area.
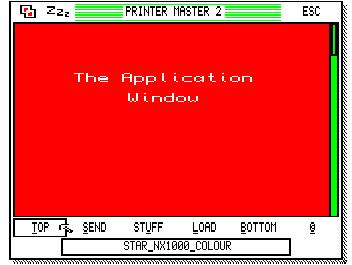
In many programs, an application window may be completely filled up by an APPLICATION WINDOW MENU.
10. APPLICATION WINDOW MENUS
An APPLICATION WINDOW MENU is just that. It is a menu, held entirely within an application window. Loose items, as discussed above, are sometimes referred to as loose menu items, but should not be confused by application window menus or application menus.
Once again, an application window is shown below in a screen dump from the program Printer Master 2.
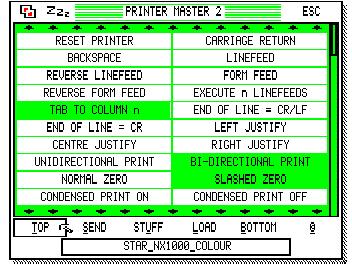
As you can see by comparing this screen shot with the one above, the entire application window has been filled up with a menu. This menu is currently showing a number of SELECTED menu items. These are the ones that are shaded. The unshaded menu items are in a state known as AVAILABLE. Not shown on the above screen shot, is the UNAVAILABLE state for a menu item as this varies from program to program and from programmer to programmer.
An AVAILABLE menu item is one that the user of the program can select by HITting it. In many programs, DOing a menu item may also select it, but can be that DOing a menu item will cause some action to be carried out as well.
Of course, HITting a menu item can also carry out some action - it is all up to the programmer - read the manual !
Normally, a SELECTED menu item is highlighted in some way, in the above screen shot, the selected items are shaded to make them stand out. Selected menu items are the ones that are to be processed in some way at a later stage in the program. They may be a list of files to copy or delete etc. It all depends on what the program is doing.
UNAVAILABLE menu items are the ones that are no longer able to be selected. If a program is deleting files from a disc, and has not updated its display, any file that has been deleted from the disc already (by the program) will not be able to be deleted again. These filenames will be made unavailable.
A lot of programs show unavailable items in a different INK and/or PAPER colour while others show the unavailable item by printing their names using an INK colour that is a stippled colour thus the file name, for example, would appear to be incompletely printed. HITting or DOing an unavailable item will have no effect.
(Loose items can also be available, selected or unavailable at any time - it is up to the programmer and usually depends upon what the program is doing at that time.)
When an application window is too small to show everything that is to be fitted into it, then SCROLL or PAN bars will be shown.
11. PAN and SCROLL BARS
In the screen shot above, there are a number of menu items showing in the application window menu. However, down the right hand side of the menu there is a position indicator while underneath and above the menu items there is a set of SCROLL BARS. The figure below highlights these.

The scroll bars are used to move the visible area of the menu up and down so that the whole height of the menu can be accessed. By HITting on a scroll bar, the menu will scroll up or down by a single row. If you DO a scroll bar, the menu will scroll up or down by a whole page (minus one row). Instead of HITting and DOing, ALT and UP or ALT and DOWN scrolls one line in the appropriate direction and ALT SHIFT UP or ALT SHIFT DOWN pages in the appropriate direction.
Regardless of whether HIT or DO is used, the position indicator will show the position of the visible area of the menu relative to the height of the whole application menu. In our screen shot above, the visible area is at the top of the menu.
The position indicator can also be used to move around the menu. If you position the pointer over the scale area (above or below the actual indicator) and HIT it, the menu will scroll to that relative position.
If you move the pointer over the actual indicator and DRAG it up or down (DRAG means hold down the LEFT button or SPACE key and move the pointer while holding the button down), the menu will scroll up and down to follow the indicator.
Warning, HIT the position indicator, don't DO it. If you DO in the position indicator scale area, you may SPLIT the application menu. This is shown below.

As you can see, there appears to be two application menus in the same application window. If you look closely, there is a separator within the scale area which shows where the top half ends and the bottom half begins. Although each menu can be scrolled independently, they are both just separate parts of the same menu - but this allows you to see bits at the top and bits at the bottom all at the same time.
To rejoin the two halves, DO the separator.
You will notice that the size of the position indicator is relative to the size of the visible menu items relative to the total size of the entire menu. If the visible portion is a large fraction of the whole menu, the indicator is bigger.
Many programs do not allow an application menu to be split like this, others allow a number of splits.
PAN arrows and indicators are identical to SCROLL ones apart from their vertical orientation. PAN arrows allow the menu to be panned sideways as opposed to the SCROLL arrows vertical movements. The PAN indicator shows where you are relative to the width of the entire menu.
12. SPRITES, BLOBS & PATTERNS
These may be mentioned from time to time in PE program manuals. They are quite simple really, a SPRITE is a picture that appears on the display somewhere. A pointer is just a sprite that is moved around the screen. Sprites may be drawn to look like text, for example, in logos and programmer's names etc, or they may be small pictures to represent some function of the program - a picture is worth a thousand words etc.
BLOBS and PATTERNS seem to stick together a lot. They need to be combined in order to see something on the screen. A SPRITE can be thought of as a PATTERN combined with a BLOB to make a picture.
While a SPRITE has both shape and colour, the PATTERN has only colour information. The BLOB contains all the shape information.
While the SPRITE holds all its colour and shape data, a single BLOB can be used to supply the shape data for a number of shapes and by using different PATTERNS in combination, each combination can show the same shape in different colours.
If SPRITEs are used to display a row of squares, for example, each one will have the data for the square and the data for the colour. As the shape data is duplicated in each SPRITE it gets a bit wasteful if there are more than a few.
A BLOB that holds the shape data can be combined with a number of different PATTERNs and thus we have made a saving on the amount of memory required to show the row of squares.
13. PICKING PROGRAMS
Without the PE, you pick a required program by repetitive use of CTRL and C to activate the cursor in the next program in the list. Many times you will not know which program is now flashing and confusion reigns.
With the PE installed, picking a program is quite simple - move the pointer over some part of its display and HIT or DO it. Once this is done, you will see that the display for the chosen program is refreshed for you and you know exactly which program you are working in.
Obviously, you can only pick programs that have windows open to the screen and that have an active cursor.
Beware, some programs, can set an OUTLINE that is much bigger than the menu that is displayed. If you move the pointer to a program showing under one of these, you will not be able to PICK it. What you are doing is PICKing the program with the large OUTLINE instead of the one that you want. These programs are slightly badly written !
14. FINALLY
That's about all there is to it. Once you have experience of using one or two different PE programs you should find that the rest are quite easy. As more and more programs are converted or written to use the PE, the QL is probably going to end up like the PC and become dominated by these types of program. Look on the bright side, however, compare the size of a QL program, even with the PE built in with one or two PC Windoze (!) programs - they now take up many megabytes (1024 Kilobytes) in order to be used.
At the time of writing this document, my PC has a 340 megabyte hard disc that I have had to compress in order to get a few programs on to it along with Windows & Dos etc. My QL has a 40 megabyte hard disc and I still have not used much more that half of it. I have more useful programs on my QL than I have on the PC !
Having said that, this manual was produced on a PC using Windows Write (a free word processor) and Paintbrush (to tidy up the pictures). The screen shots were taken using Dilwyn Jones' SCREEN SNATCHER 2, converted to the PC Paintbrush format using Norman Dunbar's SCR2BMP and ported using Digital Precision's XOVER as supplied with MMSE. The original was printed A4 size using an Epson Stylus 800 printer and reduced to A5 by Dilwyn Jones' Photo Copier. We authors put in a lot of hard work to bring you our masterpieces you know !
GLOSSARY
ALBIN HESSLER The author of EASYPOINTER, a package to make life easier for programmers writing for the Pointer Environment.
APPLICATION WINDOW A window that is used by the program, the application, to carry out what the program does.
APPLICATION MENU A menu that is positioned within an application window. This menu may be panned and scrolled if it is too big to be shown all at once in the application window.
AVAILABLE This means that a loose item, or application menu item may be chosen. The chosen item may then be operated upon by some other part of the program.
BLOB Defines the shape, but not the colour, of something to be drawn on the screen. Considered to be half of a sprite.
BUTTON FRAME Part of QPAC2. It allows individual programs to be 'parked' as small buttons when put to sleep. This keeps them all in one place either along the top of the screen or down the side, and makes it easy to find them again later. The button frame is implemented as a THING.
DO Pressing the ENTER key or the RIGHT mouse button. Normally causes some action to be carried out.
DILWYN JONES A Welsh computer buff. Likes his QLs and at one stage formed his own small company called DJC to sell unsuspecting people programs written by people like Norman Dunbar. Lives his 'normal' life as a sound engineer. Mentioned here because he nagged me into writing this guide originally.
EASYPOINTER A suite of programs, written by Albin Hessler, which try to make life easier for programmers who want to design and write programs for the Pointer Environment.
EE An abbreviation for Extended Environment, which some people use to add to the confusion. Just another term for the Pointer Environment.
EXTENDED ENVIRONMENT Same as Pointer Environment.
HIT Pressing the SPACE bar or LEFT mouse button. Normally SELECTS something in a menu, but can be used to carry out some action if used on a loose item.
HOTKEY SYSTEM Part of the PE. Allows the use of HOTKEYS which are simply ALT plus another key. These then carry out some pre-programmed action.
HOT_REXT The file that has to be loaded into your QL to provide the hotkey system. Should be loaded after PTR_GEN and WMAN.
INFORMATION OBJECT Quite simply, an object that gives information to the user. It may be a word, some text or a filename, a small picture or anything else. Always lives in an info window.
INFORMATION WINDOW A small area of the programs display that serves no other purpose than to give the user some information. May have one or more info objects contained in it.
JOCHEN MERZ A famous German programmer who is responsible for many PE programs. Author of the MENU extensions, also known as QMENU.
JONATHAN OAKLEY A slightly less famous programmer from Britain (not sure which part) who is partially responsible for the PE. LOOSE ITEM A slight contradiction. Loose items are only loose until the programmer ties them down. Then they become fixed items ! Used on a programs display to carry out some action when HIT or DOne by the user.
MANAGED WINDOW What every well behaved PE program needs to have. This causes the PE to take control of the program and keep its screen refreshed when picked. Normally the first window opened by a program. Not all programs are managed, but probably should be.
MENU_REXT The file that should be loaded into your QL so that you can take advantage of Jochen Merz's MENU EXTENSIONS. These make file selecting etc much more fun and are probably the first contact many people have with the PE.
MOVE What to do if you are not happy with your neighbours. Or, an action that you can perform to move a program's display to another part of the QL's display. Very handy when you have more than one program trying to use the same bit of the screen at the same time. Usually carried out by judicious use of CTRL and F4.
NORMAN DUNBAR The idiot who wrote this guide, and lots of other really good QL software. Has also been known to write some Public Domain stuff and works with ICL mainframes for a living. Spends the rest of his time living in the wilds of Bradford (being from Scotland originally), looking after the Quanta C68 library and pretending to be intelligent.
OUTLINE Basically, the area of the screen that is managed by the PE for a particular program. Everything that the program does must take place within this outline. Moving the pointer outside of the outline will normally result in a NO ENTRY or PADLOCK pointer appearing.
PAN BARS Vertical lines of arrows, sometimes seen on the left and right edges of an application window. These allow whatever is being shown in the application window to be panned left and right to show more of it.
PATTERN These hold the colour information that is combined within a BLOB to display something on the screen. Also known as half a sprite.
PC Something we try not to talk about. A sub standard computer that requires a QXL card in order to make it feel good. Many businesses use PCs without a QXL and seem to manage ok. (Don't take this too seriously !)
PE The Pointer Environment.
POINTER Used to show where you are on the screen. May be moved by mouse or by cursor keys. The pointer will normally be a small arrow head, but individual programmers have been known to change it to something else. Changes whenever a move or size operation is being carried out and also when other events are taking place. Actually gives quite a lot of information.
POINTER ENVIRONMENT Tony Tebby and Jonathan Oakley's love child. If you still don't know what it is all about, go back to page one and read it all again !
PRIMARY WINDOW See MANAGED WINDOW.
PTR_GEN The first file that should be loaded into your QL in order that you might use the PE. Controls the console driver and the pointer. Refreshes the screen when switching from job to job and allows you to forget which combination of keys you used to use the refresh the display !
QMENU The short name for Jochen Merz's MENU EXTENSIONS as described above.
QL I can't remember. I think it is a small black oblong that seems to be quite popular as a personal computer. I have three and I won the last one at a Quanta workshop for 50 pence in the raffle !
QPAC2 A suite of Pointer Driven accessories that are used by many people. Quite difficult to get to grips with initially, but if you start simple and work your way up gradually, you will soon get the hang of it. Buying QPAC2 is a sure fire way to get all the various bits of the PE.
RESIZE See SIZE.
ROYALTY A payment made to an author every time a program written by him or her gets sold. May also be paid to an author by another author when a program writen by one of them is included in a program written by the other. The PE implies that Tony Tebby etc get paid royalties when you buy PE programs that include the various PE files.
SCROLL BARS Horizontal lines of arrows that cause an application menu to be scrolled up and down when HIT or DOne.
SELECTED The state of a menu item or loose item after it has been HIT. This normally causes the item in question to change colour, or show in some other way that it has been selected.
SIZE The action that may be allowed by some programs so that their display can be extended and shortened so that more or less room is taken up on the QL's display. Not always present. Usually activated by CTRL and F3.
SLEEP Putting a program to sleep is a good way of clearing it from the screen but keeping it handy so that it can be used later. Normally done via the CTRL and F1 keys. May need the QPAC2 button frame in order to work. Similar to 'minimising' a PC Windows program but without the pretty pictures.
SPRITE What you get when you put a BLOB and a PATTERN together. A sprite holds both shape and colour data and can be used as an info object or a pointer. Usually serves to represent something such as a logo and in the best programs, sprites are worth a thousand words or two as they provide information without requiring words.
Sprites in the PE have nothing to do with those found in many games etc which are little pictures that wander at random around the screen, crashing in to each other, exploding and generally being a nuisance. PE sprites are much better behaved.
THINGS Things are bits of program, data, extension routines etc that can be accessed by many different programs. Their name arises from the fact that it is difficult to pin them down exactly or to define what they are !
TONY TEBBY The man who made it all happen. He originally wrote QDOS, the QL's operating system and then the PE with Jonathan Oakley. Now does his thing in France where he 'retired' a few years ago. Still writes programs and most recently produced SBASIC for the QXL and other QDOS compatible machinery.
UNAVAILABLE Similar to an overdraft. A menu item or loose item that will not let you select it, no matter how hard you try. It will normally be drawn in some manner that shows that it is not usable. May become available later on in the program when some set of circumstances has been set up.
WAKE Your program will wake up if it has been put to sleep and you DO it. Normally causes the program to redisplay its screens and lets you carry on from where you were. A WAKE can be forced by using CTRL and F2 together and this will cause the updating of the display if required. Lists of files on a device perhaps, would need a WAKE if the disc was changed.
WMAN The Window Manager part of the PE. Handles all the menuing and windowing that goes on in these programs. Must be loaded after PTR_GEN and before HOT_REXT and MENU_REXT if these are to be used.
Return to Pointer Environment documents page | Return to Documents Index| Return to the home page | Go to Downloads Index