Pointer Environment And Mice On QDOS
 While the Pointer Environment is built into the SMSQ/E variant of the
operating system, QDOS needs us to add three files to have the pointer
environment on a QDOS system (including Minerva). Collectively, these
three files are known as the Pointer Environment or Extended
Environment. The Extended Environment is strictly speaking the
combination of the first two and the hot_rext file, whereas the term
Pointer Environment can be used to indicate a system where the Hotkey
System is not present.
While the Pointer Environment is built into the SMSQ/E variant of the
operating system, QDOS needs us to add three files to have the pointer
environment on a QDOS system (including Minerva). Collectively, these
three files are known as the Pointer Environment or Extended
Environment. The Extended Environment is strictly speaking the
combination of the first two and the hot_rext file, whereas the term
Pointer Environment can be used to indicate a system where the Hotkey
System is not present.
These three files are called ptr_gen, wman, and hot_rext. Nowadays,
they are freely available and can be downloaded from the PE page on my
website at http://www.dilwyn.me.uk/pe/index.html
In general, you should use the most recent version available, unless
that version is known not to work on your system for some reason.
Older versions are available on the page, mainly for historical
interest and also for software authors to test their programs with.
The usual way to install these files is to write a short program called
BOOT, which is a short program
written in SuperBASIC, that runs automatically when you start your QL
or emulator. Usually from floppy disc or from a hard disc, although
nowadays it is perfectly possible to arrange to boot from a flash
memory device such as SD card, RomDisq, or compact flash card.
- Ptr_gen is known as the
Pointer Interface. It provides an on-screen pointer, usually a small
arrow symbol, to point to and control the various objects and menus in
the program. It also provides the window save and display system,
whereby when you use CTRL C to switch between programs, it “remembers”
the screen display of each program.
- Wman is known as the
Window Manager. It manages the appearance of the programs, often
providing a standardised appearance so that most programs which use the
Pointer Environment can look alike – menus work similarly in most
programs and so on.
- Hot_rext is referred to
as the Hotkey system. Keys with definable actions attached to them.
Plus something known as the Thing system. A Thing is a general system
resource, but their types can be so vague and vastly different we have
to give them a very generalised name, hence Thing. Don’t worry too much
about them at this stage.
Here is an example program. We will assume that the files are loaded
from a floppy disc drive, called FLP1_.
100 REMark BOOT program for Pointer
Environment
110 base1 = RESPR(xxxxx) : LBYTES FLP1_PTR_GEN, base1 : CALL base1
120 base2 = RESPR(yyyyy) : LBYTES FLP1_WMAN,base2 : CALL base2
130 base3 = RESPR(zzzzz) : LBYTES flp1_HOT_REXT,base3 : CALL base3
xxxxx, yyyyy and zzzzz are the length of the ptr_gen, wman and hot_rext
files respectively, in bytes. The length is usually given where you
downloaded the files from, but if not, you can easily check the length
using a file handling program, or using the FLEN function in Toolkit 2:
PRINT FLEN(\flp1_ptr_gen)
PRINT FLEN(\flp1_wman)
PRINT FLEN(\flp1_hot_rext)
Note the backslash before the filename. If your version of Toolkit 2 is
so old that you can’t use FLEN with a backslash like that, use
something like this instead:
OPEN_IN #3,flp1_ptr_gen : PRINT
FLEN(#3) : CLOSE #3
OPEN_IN #3,flp1_wman : PRINT FLEN(#3) : CLOSE #3
OPEN_IN #3,flp1_hot_rext : PRINT FLEN(#3) : CLOSE #3
The filenames are not case sensitive (flp1_ptr_gen is exactly the same
as FLP1_PTR_GEN as far as the QL is concerned). The filenames may be
put in quotes if you prefer, e.g. “flp1_wman” or ‘flp1_hot_rext’).
If you have Toolkit 2 on your system, there is a way to simplify the
BOOT program by using the LRESPR command to replace the
RESPR/LBYTES/CALL sequences. Toolkit 2’s name is often abbreviated to
TK2.
100 REMark BOOT program for Pointer
Environment using TK2
110 TK2_EXT : REMark activate Toolkit 2 on some systems
120 LRESPR flp1_ptr_gen
130 LRESPR flp1_wman
140 LRESPR flp1_hot_rext
Line 110 contains a command called TK2_EXT. This is used to activate
Toolkit 2 on some older systems which have it built in, but not
automatically activated when the computer starts. Some floppy disc
interfaces may need a TK2_EXT command to start Toolkit 2. Some
interfaces, such as the Super Gold Card have commands which can make
the interface remember whether or not to start Toolkit 2 as the system
starts. You will need to refer to the interface documentation to check
for each individual interface type. Or you can adopt a trial and error
approach. If the extensions work without a TK2_EXT command, then you
don’t need a TK2_EXT command in the BOOT program (although it does not
harm if present).
This simple program is enough in itself to use the pointer environment
at its simplest level. You can now use CTRL C to switch between two or
more programs running on your system, to save and restore the display
of each program as you switch to it or from it.
If you wish to add other extensions or toolkits to this simplest of
BOOT programs, it is quite easy to do so. We just need to be aware that
such things may need to be installed in a particular order, whether
before or after the ptr_gen, wman and hot_rext extensions.
The rule of thumb is that most such extensions will go after the
pointer environment files. But there are exceptions, and the software
manuals will generally tell you about this. For example, if you use
Lightning or Lightning Special Edition screen accelerations software,
those extensions would need to be installed BEFORE pointer environment,
but after Toolkit 2 if the TK2_EXT command is needed for example.
There are some versions of Toolkit 2 out there, such as the old
Reconfigurable Toolkit 2, or versions adapted to run from RAM memory
(usually made by saving an image of a copy of Toolkit 2 from a ROM).
These should be loaded BEFORE the pointer environment unless the
Toolkit 2 documentation says otherwise.
If you have a SuperHermes or other keyboard interface fitted on your QL
system, it usually needs a short keyboard driver file if using an
extension keyboard (unless the driver software is loaded from an EPROM
or ROM somewhere on your system). Its instructions will tell you where
to install it in a BOOT program if required, but this will usually be
one of the first items loaded. SuperHermes can also provide for using a
mouse on your QL system – follow the SuperHermes manual’s instructions
for where best to load the mouse driver software.
Many pointer-driven programs come with a set of extensions called the
Menu Extension or QMenu, usually as a file called MENU_REXT. This
provides a set of standard menus and other features which programs can
use to build on the facilities offered by the pointer environment. This
should be loaded AFTER the three standard pointer environment files,
e.g.
100 REMark BOOT program for Pointer
Environment using TK2
110 TK2_EXT : REMark activate Toolkit 2 on some systems
120 LRESPR flp1_ptr_gen
130 LRESPR flp1_wman
140 LRESPR flp1_hot_rext
150 LRESPR flp1_MENU_REXT
In general, small toolkits of extensions for the BASIC interpreter (new
keywords for the language) should be installed after these unless the
documentation says otherwise. Software such as QPAC2 which is also
generally installed via a BOOT file would also be installed at this
stage. Once you have added all the software needed, you can then start
on things like Hotkey definitions to control actions taken when keys
are pressed in conjunction with the ALT key on a keyboard – there’s a
guide to Hotkeys at http://www.dilwyn.me.uk/pe/index.html
.
Some systems require that a mouse driver be installed to allow a mouse
to be used on your system. Again, the documentation will usually tell
you where the mouse driver should be added to your BOOT program. In
general, this will be after the three base files, but before other
things in the boot program, e.g. to add the serial mouse driver
Sermouse, you could add this at line 145 or line 160 in the example
above:
145 LRESPR flp1_SERMOUSE
The filename of the sermouse driver may vary according to the package.
Mouse Systems For QL With Pointer Interface
With so many emulators and add-ons for the QL nowadays, it is hard to
give a definitive answer as to which mouse system is best used with a
QL which has the pointer interface installed.
Emulators
On some emulators which run QDOS, the pointer interface will
automatically detect and use the mouse used by the host operating
system. By and large, the detection is either automatic, or documented
in the emulator manuals.
An exception to this used to be the emulator called QemuLator, which
until recently needed a small piece of code called MacMouse to be added
to allow the pointer interface to be controlled by mouse in the
emulator (as of v2.06 of ptr_gen, released in 2021, this should no
longer be required). This was added just after the three pointer
environment files in the BOOT program. Note that the manual for this
emulator says that this is “available only with the ‘Expanded QL’
registration”. In other words, the free unregistered demo version may
not work with a mouse. On registered versions of the emulator, you
could add the MacMouse software just after hot_rext in the example BOOT
file above:
100 REMark BOOT program for Pointer
Environment using TK2
110 TK2_EXT : REMark activate Toolkit 2 on some systems
120 LRESPR flp1_ptr_gen
130 LRESPR flp1_wman
140 LRESPR flp1_hot_rext
145 LRESPR flp1_MacMouse11
150 LRESPR flp1_MENU_REXT
The ‘11’ is the version number and may vary if your versions of the
emulator has something other than version 1.1 of MacMouse.
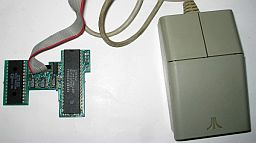
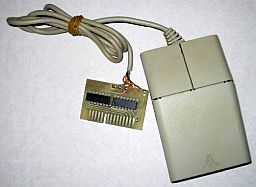
QIMI
Probably the oldest pointer environment mouse interface for the QL,
this interface originally built by QJump and after that sold for a
while by Quanta. It is a small circuit board which fits inside the QL
and uses an Atari-style mouse. Once installed, it is automatically
detected by the pointer environment and no further software is needed.
The name QIMI stands for QL Internal Mouse Interface. There is a picture of the mouse and interface near the top of this page.
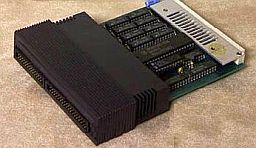 Sandy SuperQBoard
This was a mouse interface included in some of the disc interfaces
released for the QL by a company called Sandy in the UK. Broadly
equivalent to a QIMI interface, this type of mouse is also detected
automatically by the pointer interface. If you have a SuperQBoard
without the mouse interface on-board, there are some documents
available at http://www.dilwyn.me.uk/docs/hardware/sqbmods.zip
about upgrading a SuperQBoard.
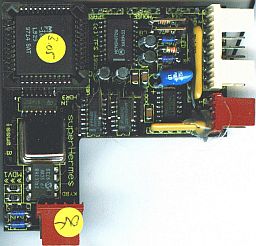 SuperHermes
This was a circuit board from TF Services, designed as an enhanced
replacement for the 8049 or Hermes second processor in a QL. Among
other things, it allowed an external keyboard, additional serial ports
and for a mouse to be added to the QL. Either a Microsoft or Mouse
Systems mouse could be used. It required a small piece of code called
called IPCEXT to be used. Add this to your boot file as indicated in
the SuperHermes manual, using the IPCMOUSE extension to select the
appropriate serial port and IPCSLOW command to control mouse
acceleration. The IPCMOUSE commands should be called after the pointer
environment has been installed in the BOOT program.
SERMouse
This is probably the simplest way to add a mouse to a QL with pointer
environment, as it allows a standard serial mouse to be connected to a
QL serial port (usually via a short cable adaptor) and uses a small
piece of software to go between the mouse and the pointer interface, to
connect the two. It was a little fiddly to set up the software and
hit-and-miss with models of mouse. But when it works, with a suitable
mouse, it was probably the simplest and most cost-effective approach to
adding a mouse to a QL. This type of mouse could be used with a QL or
with an Aurora card. There are two versions of the sermouse software on
my website, at www.dilwyn.me.uk/pe/index.html
, since some users have found that one version works with some mouse
types, while the other version is required for some mouse types. Most
users connect this type of mouse to SER2, and a user on QL Forum has
kindly made a wiring diagram for the adaptor needed to connect a mouse
with 9-pin D connector to the six pin UK ser2 port.
Cursor Mouse
 Some older mouse interfaces for the QL work by emulating the cursor
arrow keys, a bit like the CTL1 joysticks do. These include the Smiling
Mouse, ABC mouse, and Mersey Mouse interfaces, for example. The pointer environment can, in
the absence of a mouse, be controlled using the cursor arrow keys on
the QL keyboard, with the two mouse buttons equating to the space bar
and ENTER keys. This means that this type of mouse could in theory at
least control the on-screen pointer, although the speed and response
may vary from type to type.
Some older mouse interfaces for the QL work by emulating the cursor
arrow keys, a bit like the CTL1 joysticks do. These include the Smiling
Mouse, ABC mouse, and Mersey Mouse interfaces, for example. The pointer environment can, in
the absence of a mouse, be controlled using the cursor arrow keys on
the QL keyboard, with the two mouse buttons equating to the space bar
and ENTER keys. This means that this type of mouse could in theory at
least control the on-screen pointer, although the speed and response
may vary from type to type.
 If you fancy building your own mouse interface of this type, Gianni
Carugno has devised a PS/2 mouse to QL CTL port interface to allow a
PS/2 mouse to be connected to a QL and to work like the cursor arrow
keys – details at http://www.dilwyn.me.uk/docs/hardware/gc_qlmouse.zip
If you fancy building your own mouse interface of this type, Gianni
Carugno has devised a PS/2 mouse to QL CTL port interface to allow a
PS/2 mouse to be connected to a QL and to work like the cursor arrow
keys – details at http://www.dilwyn.me.uk/docs/hardware/gc_qlmouse.zip
If you have the DIY Toolkit software from Simon Goodwin, he produced
some software which allowed a two or three button Microsoft or Mouse
Systems 'PC' mouse connected to the serial ports to be used as a
cursor-key equivalent mouse. The software is available in Volume I of
DIY Toolkit, download it from http://www.dilwyn.me.uk/tk/index.html
There is a circuit diagram and scanned documents on my site for a
Mersey Mouse – download the package from http://www.dilwyn.me.uk/docs/manuals/Mersey_Mouse.zip
One mouse system which will NOT support the pointer environment is the
ICE mouse system, originally released by Eidersoft. Although quite a
useful system for the QL in its own right, only software which knows
how to use the proprietary system will be able to make use of this.
Moving On With Pointer Environment
When you’ve installed the pointer environment as described above, you
might not immediately notice that anything has changed. On the whole,
the QL display will not immediately look any different – you could be
forgiven for thinking nothing had changed. The first thing you’re
likely to notice is that the QL saves and restores program displays as
you switch between them with the CTRL C keypress.
I’ve covered just enough of the basics here to get you going. I would
suggest that in order to read further, and to find out what else is
possible, plus start to get to grips with the terminology and common
features, you look for documents such as Norman Dunbar’s PE Idiot’s
Guide (available to read online at http://www.dilwyn.me.uk/docs/ptr/peig/pe.html
), the Hotkey System guides at http://www.dilwyn.me.uk/pe/index.html
and when you feel a little bit more confident, the QPAC2 user’s guide
at https://www.kilgus.net/smsqe/qpac/
.
The PE Idiot’s Guide is just that. A down to earth and very basic guide
to the pointer environment. It helps to explain the new terminology –
what is a loose item, what is an information window, and so on.
Front Ends
In itself, the pointer environment doesn’t put a “front end” or a
graphical user interface on your QL. You still start programs by using
EXEC commands, you still switch from program to program using CTRL C,
and you still end programs in the same way.
Once you’ve got used to switching between programs, defining hotkeys
and the general convenience of the pointer environment and mouse
control, you may want to try some front-end software for the QL. These
generally let you assign a name or an icon to a program and you can
start that program by clicking on the name of the program, or the icon
representing the program. Many will let you pick (or select) between
programs already running, manage files by letting you select which
files to copy, delete, rename, etc (file management), and generally
manage programs by helping you do things like stop programs, change
their priority (running speed relative to each other) and so on.
A number of these types of programs have been written for the QL over
the years, and a selection may be found on the Front Ends page on my
website, at http://www.dilwyn.me.uk/frontend/index.html
These may take the form of something along the lines of Start menus and
Taskbars on other operating systems – software such as Qascade and
Q-Bar. Qascade is a Start-menu type of program, which sits in something
called the "bytton frame" (another feature of the pointer environment
and QPAC2!), whereas Q-Bar implements a taskbar and Start menu. Others
may be more ambitious desktop environments, such as QDT, or program
launchers such as Launchpad, DEV Manager and several others on that
page. Some are text based, while others like QDT and Launchpad are more
graphically orientated. You can also get program docks such as my
Q-Dock and Wolfgang Lenerz’s Dock. Some of these front ends need SMSQ/E
(e.g. QDT and Q-Dock), while others will work on QDOS with pointer
environment.
Pointer Environment Version 2
At various stages in the life of the pointer environment, some
emulators and systems such as the Aurora motherboard started to
implement higher resolution screens (bigger than the usual 512x256 QL
screen). Then they went on to implement screen modes with more than the
usual four or eight colours of the QL. Although adding the pointer
environment to a suitable QDOS system can allow suitable systems to
implement higher resolution modes, what it can’t do is to add full
support for higher colour modes. You need SMSQ/E for that.
But as pointer environment version 2 began to mature, there was
increasing support for some of the “Window Manager 2” features, such as
colour palettes or ‘themes’. This is a more advanced subject and you
can find further articles on such subjects elsewhere in this website.
Return to home page | Go to section index | Go to documents index
