
QL
User Guide
Introduction
Beginner’s Guide
Reference Guide
Keywords
Concepts
Applications Software
QL Quill
AL Abacus
QL Archive
QL Easel
Information
Sinclair Research has a policy of constant development and improvement of their
products Therefore the right is reserved to change manuals, hardware, software and
firmware at any time and without notice.
QL User Guide Second Edition
Published by Sinclair Research Limited 1984
25 Willis Road, Cambridge
Edited by Stephen Berry (Sinclair Research Limited)
©Sinclair Research Limited
©Psion Limited
Printed and bound in Great Britain by
William Clowes Limited, Beccles and London
Designed and typeset by
Keywords, Manchester
No part of this User Guide may be reproduced in any form whatsoever without the
written permission of Sinclair Research Limited
QL, QLUB, QL Net, Qdos and QL Microdrive are trade marks of
Sinclair Research Limited.
Quill, Archive, Easel and Abacus are trade marks of Psion Limited
Introduction To The QL Programs
PLEASE READ THIS BEFORE UNPACKING THESE PAGES
Your QL User Guide is supplied unbound, to avoid damage in transit and to make rapid updating easy. In addition to this packet containing the pages of the Guide itself, you should also find a ring binder and then divider cards packed with your QL.
Insert the dividers into the binder first. The recommended order is as follows:
|
Position |
Tab Label |
|
|
|
|
Front |
Introduction |
|
|
Beginners Guide |
|
|
Keywords |
|
|
Concepts |
|
|
QL Quill |
|
|
QL Abacus |
|
|
QL Archive |
|
|
QL Easel |
|
Back |
Information |
This will put the divider tabs in a logical order. If you wish, you may put the sections in a different order, perhaps to put often used sections near the front, or even miss out sections you do not expect to use.
Now look through the pages to identify the various sections, each begins with a title page with the Sinclair logo at the top. The pages within each section will be packed in the correct order, so be careful not to mix them up, the individual sections, however may be in a different order to that shown above if a section or sections have recently been reprinted.
Once each section is placed in the binder as you like it, this sheet may be discarded, it does not form part of the Guide.
INTRODUCTION TO THE QL
When you unpack your QL computer you will find:
The QL computer

The QL User Guide
A power supply
QL Abacus, QL Archive, QL Easel and QL Quill

Three plastic feet
these can be fitted under the QL to tilt the keyboard for more comfortable typing. The pips in the top of the legs should be fitted into the holes in the rubber feet, twisting them to make them fit securely
An aerial lead
about two metres long with different connectors at either end It is used for connecting your QL to your televisions aerial socket.
A network lead
also about two metres long with identical connectors at either end It is used to connect
your QL to other QLs so that data and messages can be sent between them.
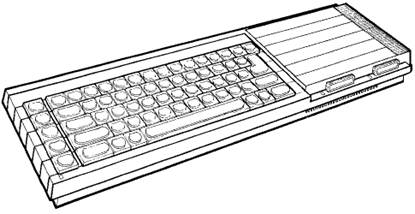
A GUIDED TOUR
On the back and sides of the computer there are a series of connectors.
There are two slots on the right hand side of the computer the two QL Microdrives. The cartridges for these Microdrives are used for storing programs and data on the QL. Next to each slot there is a small light. When the light is on the Microdrive is in use and the cartridge should not be removed. The yellow light on the front left hand side indicates whether the QL is switched on.

On the right-hand end of the QL there is a slot covered by a plastic strip. This slot is for attaching up to six more QL Microdrives. ZX Microdrives are not suitable for use with the QL but blank Microdrive cartridges can be used on either machine.
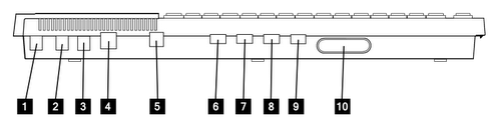
The connectors at the back of the computer are for attaching the following:
|
NET |
- connector for the QL Network |
|
NET |
- connector for the QL Network |
|
POWER |
- power supply for the computer |
|
RGB |
- connection to a monochrome or colour monitor |
|
UHF |
- connection to the aerial socket of a television set |
|
SER1 |
- RS-232 C serial port |
|
SER2 |
- RS-232-C serial port |
|
CTL1 |
- control port for joystick |
|
CTL2 |
- control port for joystick |
|
ROM |
- QL ROM cartridge software (use reversed one to 10) |
ZX ROM cartridges are not compatible with QL ROM cartridges and cannot be used in the QL.

The slot on the left hand side of the QL is used for adding peripherals (equipment to expand the computer's capabilities} to the QL. One peripheral can be plugged directly into the expansion slot.
The reset button is on the right hand end of the computer near the Microdrive expansion slot. It is used to reset' the QL to its original 'switch on' state Any programs in the machine will be lost if reset is pressed and sometimes data already recorded on Microdrive cartridges can be corrupted. Use reset with caution and always remove Microdrive cartridges before doing so.
To make the computer operate, various connections have to be made:
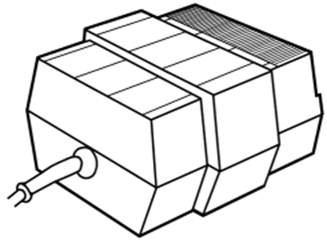
Your QL power supply has two leads. One is fitted with a small rectangular connector with three holes in it. The other is the mains lead and is supplied with bare ends to which a suitable mains plug must be fitted.
Please do not connect the power supply lead to the computer until all other leads and peripherals have been connected. Always connect the power supply lead to the computer last of all.
SETTING UP
THE POWER SUPPLY
To make the computer operate, various connections have to be made:
Your QL power supply has two leads. One is fitted with a small rectangular connector with three holes in it. The other is the mains lead and is supplied with bare ends to which a suitable mains plug must be fitted.
Please do not connect the power supply lead to the computer until all other leads and peripherals have been connected. Always connect the power supply lead to the computer last of all.
Connect the mains plug as follows:
· The blue wire goes to the terminal marked N or neutral, or coloured blue or black.
· The brown wire goes to the terminal marked L or live and coloured brown or red.
· The power supply is double insulated and does not need an earth connection.
· If you are using a fused plug it must be fitted with a three amp fuse.
· Make sure all connections are sound.
If necessary, get someone with electrical experience to help you.
THE DISPLAY
Although the QL will work once the power supply is connected, you will not be able to see what it is doing until you add a television set or a monitor.
A monitor has a screen like a television, but it cannot receive television signals. It usually has better resolution than a television set and so can display more text and is therefore more expensive.
A colour television or monitor will of course be required to make use of the QL colour display but the computer will work perfectly well in black and white representing colours as shades of grey.
Most television sets in current use will be suitable for the QL provided they are able to receive 625 line UHF transmissions, i.e. BBC2 and Channel 4.
Locate the aerial socket at the back of your TV and remove the aerial cable that may be plugged into it. If your set has more than one socket, use the one labelled UHF or 625. Plug in the QLs aerial lead. Use the end that looks similar to the original aerial plug, and plug the other end into the socket marked UHF on the back of the computer.
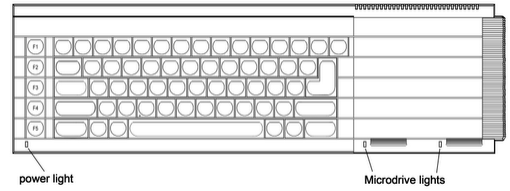
Plug the power supply into a mains socket and switch on. Remove any cartridges from the Microdrive slots and push the small power supply connector into the three pin plug marked POWER on the back of the QL.
The yellow power light below the F5 key should now be glowing and your set up should look like this:

When the computer has been on for a while, the case above the Microdrives will feel warm, this is quite normal. The QL has no on/off switch but can be turned off by unplugging the power supply connector. Remember that any program or data in the machine will be lost when it is turned off and should first be saved on a Microdrive cartridge (for details of how to do this see the Beginner's Guide and Concepts sections). If the QL is not going to be used for a while you should also switch the power supply off at the mains.
TUNING IN
The display signal to the television set is near channel 36. If your set has continuous tuning, tune to channel 36. If your television has push buttons, choose an unused button and tune this to the computer' s signal. You may need to consult your dealer or the TV instruction manual to find out how to do this.
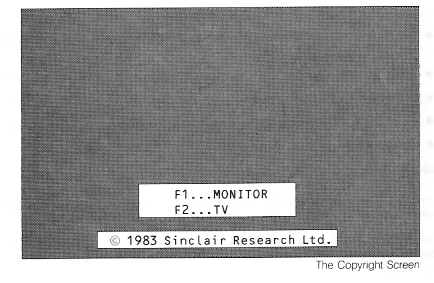
Once you are correctly tuned in you should see the copyright screen.
The QL doesn't use television sound because it has its own internal loudspeaker. You can turn the television volume down if you wish.
A coloured pattern will appear after you switch on or reset the computer, this is the QL testing its memory. The pattern will disappear after a few seconds to be replaced by the copyright screen.
If you cannot get a picture at all first check that your television can receive the normal broadcast stations. If it can then try the computer with another television set.
If you get a fuzzy or indistinct picture check that you are tuned in correctly; it may be possible to pick up the computers signal in more than one place in the tuning range. Also check that the aerial lead is firmly plugged in, and that you are using the correct socket on your television set (if it has more than one).
If you wish to use a monitor instead of a television set the connections will depend on whether it is colour or monochrome details can be found in the Concepts section under the heading Monitor. A monitor lead with a plug to fit the QL's RGB socket is available from Sinclair Research. The order form is in the Information section of this guide.
The QL needs to know if you are using a monitor or a television set. Press:
F1 for a monitor
or
F2 for a television
Microdrive 1 will run briefly and the red Microdrive light will glow, the QL is looking for programs to load and run ( this can be ignored for now). The computer will start up and display its cursor a flashing coloured square, and the computer is now ready to accept commands.
USING THE QL
Unlike previous Sinclair computers there is no single keyword entry on the QL. However various keys and groups of keys have special meanings.
Enter
The ENTER key is used to indicate to the computer that you want it to do something. Perhaps you have typed in a command and want the computer to execute it or you may want to tell the computer that you have finished typing in data.
Shift
The keyboard has two SHIFT keys which perform the same function. Pressing SHIFT and an alphabetic key together will generate capital letters (upper case characters). On non alphabetic keys SHIFT will cause the upper engraved character to be generated.
For example:
SHIFT & 5 will give %
Caps Lock
Pressing the CAPS LOCK key once will force alphabetic keys to generate capital letters regardless of whether the SHIFT key is pressed. This will remain in effect until CAPS LOCK is pressed again.
Delete
Hold down the CTRL key and then press the ß key. The character to the left of the cursor will disappear and the cursor will move to the left. Hold down CTRL and press the à key. The cursor will not move, the character it was on will disappear and text to the right will move to fill the gap.
The QL screen may be divided into different areas or windows at will. Once you have switched on (or reset) and pressed F1 or F2, the screen will look like this:

The long thin window at the bottom is used to display commands typed into the computer and initially will display the flashing cursor. When the cursor is visible the QL is ready to accept commands or data it disappears when the computer is busy. As you type, the cursor will move along the line showing where the next character to be typed will appear.
If the machine ever fails to respond correctly or you want to force a SuperBASIC program to
stop hold down the CTRL key and press the space bar.
The computer should then display its cursor. If this doesn't work remove any Microdrive cartridges and then press reset.
The message Bad Line appearing in the command window means that the computer doesn't understand a command that you have typed in. Delete or correct the line using the cursor keys.
The two QL Microdrives are called mdv1_ on the left and mdv2_ on the right.
Cartridges must be placed correctly into the Microdrives. Hold the cartridge by the ribbed plastic handle and remove it from its protective cover. The cartridge's name label, or the recess for its stick-on label, should face upwards.

Cartridges should always be treated with care. You should never turn the QL on or off with a cartridge in the Microdrives. Take care when inserting or removing cartridges, wait until the Microdrive lights have gone out before removing the cartridge, be gentle but firm. Never touch the tape in the cartridge and always return the cartridge to its protective cover.
Before a blank cartridge can be used it must go through a process called formatting. This process erases any data or programs on a cartridge so always be sure that all cartridges are clearly labelled with their contents and check that cartridges to be formatted contain no useful data. Instructions for formatting cartridges are contained in the Information section.
All magnetic storage media including Microdrive cartridges eventually suffer from wear. Hence it is strongly recommended that all important programs and data should be stored on at least two cartridges, that is 'backed up'. This means that if a cartridge is damaged and the data lost then at least part of the data can be recovered from the relevant back up cartridge. If you are continually adding data to a cartridge it must be backed up often unless you do so you will lose everything that was added since the last backup if the main cartridge is damaged. Instructions for backing up cartridges are contained in the Information section.
There are several ways of using your computer and the User Guide. You can use ready made programs such as those supplied with the QL, or you can write your own programs in SuperBASIC.
To use the QL programs, first read the Introduction to the QL Programs later in this introduction and then the relevant section for each program concerned.
If you are a newcomer to computing and wish to write your own programs, you should read the Beginner's Guide. If you are familiar with BASIC programming, you may prefer to read from Chapter 8 in the Beginner's Guide - From BASIC to SuperBASIC. This chapter describes the major differences between BASICS you may already be familiar with and QL SuperBASIC. Alternatively, if you are feeling confident, the Keywords and Concepts sections should be useful.
IF YOU HAVE A PROBLEM
If you have a problem using your QL or QL programs, then:
1. Refer to the appropriate sections in the QL User Guide
2. Consider joining the QL Users Bureau for assistance on the QL programs. Full details of the services offered by QLUB and instructions for joining are contained in the Information section of the QL User Guide under the heading QLUB
3. Refer to books published about the QL.
If your problems persist and you think they may be caused by a fault in either your QL or in the QL program cartridges then refer to the Guarantee details in the Information section of the QL User Guide
INTRODUCTION TO THE QL PROGRAMS
This introduction outlines the four programs supplied with the QL and describes their
common features.
The four programs are:
QL Quill - a wordprocessor
QL Abacus - a spreadsheet
QL Archive - a database
QL Easel - a graphics program
Individual sections in this guide describe each of the four programs in detail. Don't just read them - try out the examples and experiment with each new idea.
Before you use any of the QL programs you should make at least one backup on a blank cartridge and use this copy only. Keep the original program cartridge in a safe place, and use it only for making copies. Any accidents will not then cause permanent loss of your programs.
Each QL program has a built in duplicating routine which is used as follows:
· Place the master cartridge in Microdrive 2
· Place the blank cartridge, or one containing nothing that you wish to keep, in Microdrive 1. Type
lrun mdv2_clone
· Press the ENTER key and the screen will display the message
FORMAT mdv1_ type space to continue
· Press the space bar only when you are sure that the cartridge contains nothing that you wish to keep, as everything on it will be erased. The computer will format the cartridge and will then copy the program in sections, displaying the name of each one as it does so.
· Wait until the Microdrive lights go out before removing the master cartridge from Microdrive 1.
LOADING
You should never use any of the original program cartridges except when making a copy onto a blank cartridge. All the programs are loaded similarly. There are two ways of doing this:
Without cartridges in the Microdrives, press reset. Place your copy of the program cartridge in microdrive 1, and then press either F1 or F2 as prompted. Microdrive 1 will automatically run and after a short pause a title display will appear on the screen to confirm that the program is being loaded. Once the program is loaded into the computer the program will start up by itself.
When you become more familiar with the programs and when using a printer or the network, you will sometimes find that commands need to be given to the computer before the programs start. You cannot switch off or reset the computer in this instance because your commands would be lost. Instead place the program cartridge in Microdrive 1 and type:
LRUN mdv1_boot
press ENTER and loading will proceed as before.
In both cases the program will occasionally need to load extra information from the Microdrive so keep the program cartridge in the Microdrive slot until the program has finished.
The control area at the top of the screen will guide you through each program by displaying the options that you will need most often and prompting you further if necessary. In many cases the program will suggest a suitable answer when it asks for information. Press ENTER to accept this suggestion or simply type in your own answer and the computer's suggestion will disappear.
Pressing F2 will remove this area and will make the central area larger. Pressing F2 again will restore the control area.
The central area of the screen shows the information that you are working on, for example the text of a document, the contents of a card index a graph or financial forecast It is shown in the style most suitable for the particular application.
The bottom of the screen shows the input line where for example commands that you type in are displayed.
Below this is the status area which reports on the current state of work. It displays things like the name of the data or document on which you are working how much unused memory remains, etc.
Three of the five function keys have the same meaning in all the QL programs. These are:
|
Key
|
Function
|
|
F1 |
request help |
|
F2 |
remove or restore the control area |
|
F3
|
call up the commands for selection
|
The remaining two function keys are used for actions particular to each program.
The first option displayed at the top left of the control area, indicates that help is available by pressing F1.
When you ask for HELP there will be a short pause before the display changes to show the Help information.
Help will suggest other topics for which help is available. Type the name of the topic and press ENTER. You do not need to type in the whole name, just enough characters for it to be distinguished from the other topics. You can repeat this as many times as necessary.
Pressing ENTER without selecting a topic will take you out to the previous level. ESC will
take you right out of HELP and back into the program.
Help is always available, provided that the program cartridge is in Microdrive 1. Press F1 and the most appropriate Help information will be displayed.
You can use the line editor to change or correct a line of text that you have typed in. All the QL programs use the same line editor, but each program uses it in a way most suitable for that application In QL Quill you use the line editor, for example, for editing the text in commands and QL Archive uses the editor extensively for editing database programs.
The line editor uses the four cursor keys, together with the CTRL and SHIFT keys.
|
|
|
|
Keys |
Action |
|
|
|
|
|
|
|
ß |
Move the cursor one character to the left |
|
à |
Move the cursor one character to the right |
|
SHIFT & ß |
Move the cursor one word to the left |
|
SHIFT & à |
Move the cursor one word to the right |
|
CTRL & ß |
Delete the character to the left of the cursor |
|
CTRL & à |
Delete the character under the cursor |
|
CTRL & á |
Delete the line to the left of the cursor |
|
CTRL & â |
Delete the line to the right of the cursor |
|
SHIFT & CTRL & ß |
Delete the word to the left of the cursor |
|
SHIFT & CTRL & à |
Delete the word to the right of the cursor |
|
|
|
The & symbol indicates that the first key should be held down while the second is pressed. When SHIFT and CTRL are used together then hold them both down before pressing the cursor key.
The program is loaded from the cartridge in Microdrive. You must always make sure that before using Help or using a print command that this cartridge is in Microdrive 1. Otherwise you can remove the cartridge at any time.
Use a cartridge in Microdrive 2 - and in additional Microdrives - for storing information, for example, Quill documents, Archive data files, etc.
Information can be stored on a cartridge in a file. The file must be given a file name to distinguish it from others on the cartridge. Use a file name of not more than eight characters long, without spaces. It is a good idea to use a name which describes the contents of a file for instance sales is obviously a better name for a file of sales figures than fred.
File saving and loading will use a data cartridge which is assumed to be in Microdrive 2 unless a different drive number is given. The simplest way of replying to a file name request is just to type in the name by itself, for example
sales
which automatically accesses Microdrive 2. If you wanted to access Microdrive 1 you would type:
mdv1_sales
There is a third component of a file name which you do not usually see because it is automatically added by the program. This is an extension three letters long which identifies which program saved the file. The extensions used are:
|
QL Quill |
_doc |
|
QL Abacus |
_aba |
|
QL Easel |
_grf |
|
QL Archive (data file) |
_dbf |
|
QL Archive (program file) |
_prg or _pro |
|
QL Archive (screen layout) |
_scn |
If you want to transfer information between programs, a special file is generated with the extension _exp (for export). All the programs will recognise this extension. More information on this process is contained in the Information section under the heading QL Program - Import and Export.
You can direct printer output to a file instead of to a printer so that you can print the text later This file has the extension _lis.
In all the programs except Archive you can request a list of the file names on a cartridge whenever a command needs a file name .This is useful if you cannot remember the exact name that you gave to the file when you first saved it.
Every time the program is waiting for you to type in a file name, you have the following options:
Press ENTER to accept the name the program suggests
Type in the file name followed by ENTER
Press ? followed by ENTER for a list of the files on Microdrive 2
If you type in a question mark (and ENTER) instead of the file name, the program displays
mdv2_
suggesting that it should list the files on Microdrive 2. You can accept this suggestion or you can edit the drive specifier to refer to a different Microdrive (mdv1_ ) and then press ENTER to list the files. When the list is complete the program asks you to type in the file name.
Archive does not use this method Instead there is a command (dir) which lists the files.It allows you to type in mdv1_, mdv2_ and so on, to specify the drive for which the list of files is needed.
In general, ESC cancels the current action and will restore you to a sensible point in the program. You can also use ESC to cancel any numbers or text that you have typed into the input line or abort a partially completed command.
Data can be loaded and saved on other devices besides a Microdrive. The device is specified in the standard SuperBASIC way except that the device name is preceded by an underscore ( _ ). See the devices entry in the Concept Reference Guide
.
For example, to load and save via the network
Before loading a QL program, each computer on the network must be given a station number. Switch the computer on but do not insert a program cartridges; press F1 or F2 when prompted.
To set the station number type the command NET followed by the station number of your choice. For example, to set the QL to station 5 type the command:
NET 5 ENTER
Place the program cartridge in Microdrive 1 and load the program by typing:
LRUN mdv1_boot ENTER
Once the program is running, you can receive data sent along the network by typing the load command in the normal way. If the data was being sent by station 12, you would enter:
LOAD _neti_12
This must be done before station 12 starts sending.
To send data, type in the save command. Assuming you were sending to station 23, you would enter:
SAVE _neto_23
Station 23 must be ready to receive before you press ENTER.